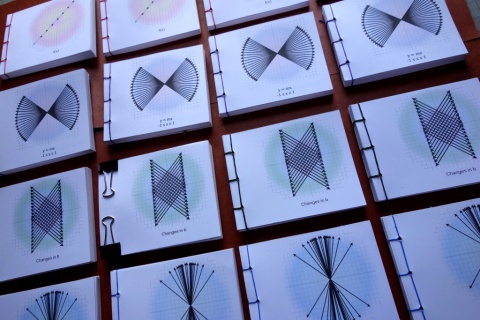
My Do-It-Yourself Equation of the Line Flip Books are ready to share.
I’ve been writing about these, on and off for months, but my work on them has been steady. My goal has been to create PDF pages that I can distribute on-line which a class of students can assemble in about 10 to 15 minutes, and which show how the changing variables in the equation of the line, y = mx + b, changes the look of the graph. I am doing this because it seems to me that the understanding of this particular equation is either a gateway or an obstacle into the continuing study of mathematics. This is my way of contributing to the conversation of how to nurture a more math literate culture.
My thought is that if students can hold the equation in their hands, that it will give them the opportunity make sense of it for themselves.
I’ve made four sets of PDF’s. I find that heavier weight papers makes the best flip book. I use Hammermill Color Copy Digital Cover paper, 60lb, but that said, if all you have is standard weight copy paper, use it.
Here are the PDF’s!

The PDF for flip book of changes of b in y= mx +b

Brisk animation
Slower animation
The PDF for flip book of changes of m between negative one and positive one
in y = mx + b

Brisk animation
Slower animation
The PDF for Flip Book to show the changes in m greater than positive one, less than negative on in y = mx + b

The PDF for Flip Book to show changes in x on the graph of y = mx + b
There, now that you’ve downloaded all the PDF’s you’ll notice that, oddly, they look like this:

What may or may not be obvious is that there are six pages on each panel, and half of these pages are upside-down. So now it’s time to give you some hints on how to make these pages into flip books, and tell you what’s up with the upside-down.
Each piece of 8 1/2″ x 11″ copy paper will contain six pages of the flip book. (To my A4 friends, I will be making an A4 version of these, but they are just not ready yet.) The pages need be cut out on the solid gray line. Let students do this with scissors! The pages are numbered, so it should be easy enough to get them in the right order. The important part, when assembling these books, is that the FLIPPING EDGES are even!!! That’s why half the pages are upside-down on the page, so that the flipping edge always fall on the edge of the paper so it doesn’t have to be cut.

Now, how to bind these small books…

Bookbinders will figure out their own ways to bind these books. These simple binding solutions are meant for the classroom or home school venue.
Before you start, note that the front and back covers aren’t numbered. You can figure out which is which. Just be sure to flip over the back page so the graphic shows otherwise your back cover will look boringly blank.
The easiest way to put these pages together is to make sure that the flipping edge is even, then wrap a rubber band tightly around the spine. This simple solution works surprising well, though every so often you might have to remove the rubber band and realign the edges. The thinner the paper, the thinner your rubber band should be. Experiment. You’ll know what works and what doesn’t.
My favorite simple solution is to use strong clips, like on the upper right in the photo above. I just found out that these are called binders’ clips. Excellent name. Use the smallest size that works. The small ones, 3/4″ wide, work just fine.
If you have access to a drill, then doing a simple sewing is swell. Drill three holes evenly spaced, about 1/4″ from the spine and follow this sequence: go through the middle hole, leaving a tail of thread behind, sew through the top hole, travel down to and go through the bottom hole, then go back up through the middle hole and tie your ends together.
If you’re a bit more adventuresome and want to look up Chicago screw posts, these make excellent bindings for flip books.

That’s it. Make lots of books. Let me know how it goes.