geometry and paper · holiday project · Ornament · Paper Ornament · Uncategorized

Round-up of Holiday Season Projects

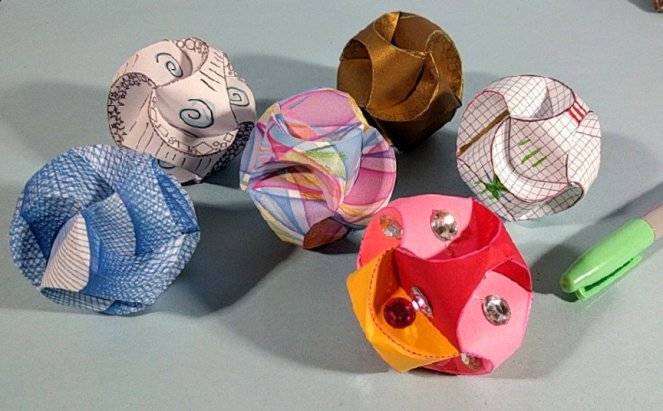
A Bevy of Paper globes
A Bevy of Paper globes Directions at https://bookzoompa.wordpress.com/2017/11/24/spiraling-paper-ornament/

Making things out of paper seems to be something we do during the holiday season.

Here’s some projects that I’ve written about with links to the full posts that explain them, that seem appropriate for the season.

This first one, the Spiraling Ornaments was surprisingly well-liked. All year, when I visited different places, I’d see ones that people I know had made.

Video tutorial (not mine) for Kaleidocycle https://www.youtube.com/watch?time_continue=4&v=tdv1GwY025M


Here’s a template for a kaleidocycle. Not particularly holiday-ish, but fun and colorful, folds into something like the image below. More about this at https://bookzoompa.wordpress.com/2017/02/19/kaleidocycles-and-tetrahedrons/

Kaleidocycle/tetrahedrons


Next, directions for a six-sided snowflake. My big tip is to use paper napkins, as they already are the right shape: no extra prep needed! Also, paper napkins cut quite easily. They are perfect for snowflakes.

how to make a paper snowflake
https://bookzoompa.wordpress.com/2010/12/14/tis-the-season-to-make-paper-snowflakes/


If you want to understand how the cuts of your snowflakes affect the final design, see below:


https://bookzoompa.wordpress.com/2014/12/02/paper-snowflake-cutting-tips/


Festive Jumping Jacks are quite fun. I’ve made these with kids just a few times, as all the knot tying makes this an intense project for anything more than a small group, but so worth the effort!

Jumping Jumping Jack

To work out how to make these you might have to look at a few posts, which are all listed at https://bookzoompa.wordpress.com/2012/02/04/wat-meer-trekpoppen-more-jumping-jacks/

The stars below are tricky to make, until you get the hang of them. I still have the ones I made on display from last year.

https://bookzoompa.wordpress.com/2017/11/09/pentagons-paper-folding-stars-origami/

The original post contains a good bit of discussion about the geometry embedded in these shapes.

Finally, making little books with stories or messages is always worth doing.

Origami books made from a multiple folded papers, to create a Star Book and a Cascading Book, aka Origami Caterpillar Book

Here’s a post that can get you started on some simple books to make with kids https://bookzoompa.wordpress.com/2017/10/10/four-books-students-can-figure-out-how-to-make-on-their-own/

For more an overwhelming amount of other book ideas, check out what I’ve tagged as making books with children

There you have it. Enough to do to keep you out of trouble at least until January.

cut paper · geometry and paper

It’s Paper Snowflake time again

paper snowflakes

I was debating whether or not to post my snowflake-making pages again. Then today I was over at Heather Bellanca’s book signing event at McCartee’s Barn and …

img_20161210_163640.jpg
Celebrating the publication of A Hound’s Holiday, illustrated by my friend Heather Bellanca

…people were cutting all sorts of cool and creative snowflakes. One thing I was hearing, though, was people wanting to make their snowflakes have specific characteristics. Heather pulled up my old Snowflake Cutting  Tips page on her device, which answered some questions. That clinched it for me. Yup, I’d republish this page.

6 snowflake cuts
How to cut snowflake once you’ve folded the paper

I’m happy to post this page again. This snowflake-cutting-tips page has never gotten many views, but I love this because I like understanding how to be deliberate about making my cuts. Sure, the first few flakes of the year, made with random cuts, are thrilling, but then, unless you have some handle on what’s going on, the snowflakes all begin to look the same, so it’s good to have an idea of how to deviate in any way that you want.

how to make a paper snowflake
how to fold paper to make a hexagonal snowflake

Of course you can’t cut a snowflake unless you fold the paper first. My number one contribution to snowflake-making is to encourage people to use paper napkins for their snowflakes, as paper napkins cut easily, are already the right shape (a big square) and are generally plentiful. Oh, and one last tip, Scotch Magic Tape is works the best for sticking these winter creations to the window because the tape peels off of the window most easily when it’s time for the snow to go away.

Happy cutting!

How to make a Snowflake with Six-Sided Symmetry, with 60 degree triangle guide included.

Decoration · folding · How-to

‘Tis the Season to Make Paper Snowflakes
zt-new-snowflake
How to make a six-sided snowflake/  helpful  60 degree triangle included

Addendum, 2016: This page has gotten about 35,000 views so I’ve decided to update this post with a slightly better set of directions on how-to-make-a-snowflake than the tutorial page further down in the this post. I’d be grateful to know if you’ve found these directions helpful.

This evening I tried, through two thousand miles of phone wire, to explain to my friend Cynthia how to make a six-sided (six-pointed?) snowflake using dinner napkins. I failed. So here are the directions, with visual aids.

Begin wiith regular dinner napkins. These are just about always square, folded into fourths. Perfect. Also, get a pair of scissors, and have at the ready a triangle that has at least one 60 degree angle on it. An equilateral triangle has three angles that measure 60 degrees, so this is the best one to use. And where can you get this triangle? Well, right here.

Print this out then cut it out.

Next, open up a napkin so that it is folded in half instead of fourths, From the middle of the folded edge, fold the bottom up 60 degrees. To get just the right angle, use the 60 degree triangle, placing the point of the triangle on the bottom of the middle fold on the napkin. See the picture below.

.

Now here’s how my snowflakes looked after I made cuts.

And here they are hanging on my front door.

If you want to attach snowflakes to a window in such a way that the tape doesn’t have to be scraped off, use Scotch Magic Tape. This is the only tape that I have found that comes off of glass when you want it to come off.

Addendum! If you want your snowflake cutting to make more sense, take a look at https://bookzoompa.wordpress.com/2014/12/02/paper-snowflake-cutting-tips/