geometry and paper · holiday project · Ornament · Paper Ornament · Uncategorized

Round-up of Holiday Season Projects

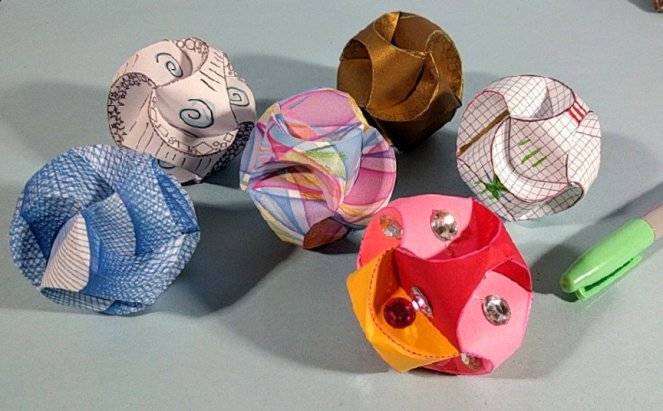
A Bevy of Paper globes
A Bevy of Paper globes Directions at https://bookzoompa.wordpress.com/2017/11/24/spiraling-paper-ornament/

Making things out of paper seems to be something we do during the holiday season.

Here’s some projects that I’ve written about with links to the full posts that explain them, that seem appropriate for the season.

This first one, the Spiraling Ornaments was surprisingly well-liked. All year, when I visited different places, I’d see ones that people I know had made.

Video tutorial (not mine) for Kaleidocycle https://www.youtube.com/watch?time_continue=4&v=tdv1GwY025M


Here’s a template for a kaleidocycle. Not particularly holiday-ish, but fun and colorful, folds into something like the image below. More about this at https://bookzoompa.wordpress.com/2017/02/19/kaleidocycles-and-tetrahedrons/

Kaleidocycle/tetrahedrons


Next, directions for a six-sided snowflake. My big tip is to use paper napkins, as they already are the right shape: no extra prep needed! Also, paper napkins cut quite easily. They are perfect for snowflakes.

how to make a paper snowflake
https://bookzoompa.wordpress.com/2010/12/14/tis-the-season-to-make-paper-snowflakes/


If you want to understand how the cuts of your snowflakes affect the final design, see below:


https://bookzoompa.wordpress.com/2014/12/02/paper-snowflake-cutting-tips/


Festive Jumping Jacks are quite fun. I’ve made these with kids just a few times, as all the knot tying makes this an intense project for anything more than a small group, but so worth the effort!

Jumping Jumping Jack

To work out how to make these you might have to look at a few posts, which are all listed at https://bookzoompa.wordpress.com/2012/02/04/wat-meer-trekpoppen-more-jumping-jacks/

The stars below are tricky to make, until you get the hang of them. I still have the ones I made on display from last year.

https://bookzoompa.wordpress.com/2017/11/09/pentagons-paper-folding-stars-origami/

The original post contains a good bit of discussion about the geometry embedded in these shapes.

Finally, making little books with stories or messages is always worth doing.

Origami books made from a multiple folded papers, to create a Star Book and a Cascading Book, aka Origami Caterpillar Book

Here’s a post that can get you started on some simple books to make with kids https://bookzoompa.wordpress.com/2017/10/10/four-books-students-can-figure-out-how-to-make-on-their-own/

For more an overwhelming amount of other book ideas, check out what I’ve tagged as making books with children

There you have it. Enough to do to keep you out of trouble at least until January.

Paper Toy

Wat Meer Trekpoppen: More Jumping Jacks

Jumping Jumping Jack
Jumping Jack assembled out of Small Cut Shapes, glued together

Welkom!  A few week ago I noticed I was getting some verkeer vanuit Nederland – traffic from the Netherlands. While it’s not unusual for a far off web site to link to my blog, what has caught my attention, and what has prompted this post, is that, day after day, for several weeks now, I continue to get visitors coming to my site through a post by . Elenea wrote what looks to be the most comprehensive post on the web about Antique Jumping Jacks, trekpoppen or, in the singular, trekpop. ( What a great word!)

Jumping Jack, Trekpop, “built” from shapes of paper
Cut out shapes to use to make the Jumping Jack

If you saw my first post on Antique Jumping Jacks and my post on Jumping Jacks made by students in 2010 you ‘ve seen that I haven’t been using patterns for making Jumping Jacks.  I encourage students to cut out interesting shapes from paper, then assemble them together to make their own unique works of art.

Jumping Jack in shades of blue

I was delighted by how different the Jumping Jacks were from each other.

“Backstage” of a Jumping Jack

Here’s the back side of my Jumping Jack. Although I use heavy paper, I’ve decided that it’s wise to use support the neck with a flat wooden spoon. Also, I taped a paper loop to the head, to attach the string to hold Jack from the top. Oddly, I couldn’t convince any of the students in my workshop to extend a string from the head. They preferred to hold the puppet’s head.

Artful Recycling · moving parts

Antique Jumping Jack Toys, made by students

This past Friday I had the good luck of being able to work with students to test drive my instructions for making cut-paper Antique Jumping Jacks. The students were young, only in grades First through Fourth, but they were a surprisingly competent group.. Some of these childrens live nearby in Vermont, the others are from New York City, Massachusetts, and New Jersey.

After seeing the my sample Jumping Jack, the students, knowing we had just under 2 1/2 hours to work, asked me how long it took me to make mine. I told them that I worked on mine for several hours,but that it would become boring to work on after awhile.so kept I kept putting it aside and coming back to it later. It’s not good to be bored while working, so I told them I was structuring the class in a way that would keep things moving.

We started by cutting and gluing together simple shapes for the head and torso, using scraps of cover weight copy paper.

I told them we would work on the torso for only 25 minutes. If it wasn’t finished by then, we would still move on to the limbs, but they could come back to the torso later.
Before any ennui set in, I brought out some paper punches (of snowflakes. cirlces, stars and hearts) which kept things exciting.

These kids seemed to have no problem keeping focused on their creations.

As soon as the limbs started getting attached, the work pace picked up.

Here’s a line-up of Jumping Jacks at rest….

…and here they are again, jumping.

“Wave good-bye, Jack!”

moving parts

Antique Jumping Jack Toy

This week the Southern Vermont Arts Center asked me to teach a Friday morning class for young children. The request was that the lesson be inspired by Alexander Calder. It is, fortunately, easy to be inspired by Calder. His work immediately conjures up colorful shapes, whimsy, animated forms, and circus-like figures. Putting this together, I decided to design an Antique Jumping Jack Toy project for the students to create.

An Antique Jumping Jack Toy, traditionally, is a figure whose arms dangle down when at rest.

When his string is pulled, Jack’s limbs jump up, as if he is dancing

To make a Jumping Jack one needs:

  • pencil to draw out the basic shape. or the confidence to just start cutting
  • cover weight paper or light cardboard
  • 4 or more paper fasteners (depending on whether or not you want to hinge the elbow and knee joints)
  • a one hole paper punch
  • scissors
  • needle
  • heavy thread

Start by planning out the pieces. Cut out torso (with head) arms and legs. Punch holes at attachment points

(Please note the picture above is NOT intended to be a pattern! If you really want to be provided with a pattern, leave me a note in the comment box, and I will email you a pattern that I created by a shameless reappropriation some images I found on the internet….)

Next, attach limbs to torso with paper fasteners. The paper fasteners should be loose, to allow the limbs to swing.

Finally, sew thread at the top of the limbs, right above the paper fasteners as shown by the green line in the picture above. Be sure to really be right above the paper fastener attachments, or toy will not be a good jumper. Also, attach a string to top and bottom strings as shown, and let the end of this string dangle loosely below Jack’s feet.

Now pull the string and watch him go. Oh, you might want to put a string through the head to hold him by.

Here you can see that I hinged the knees with paper fasteners.

Once you have the basics of this down, be playful with the pieces.  This particular guy was made from the scraps of paper that were left over from other projects.

Addendum   Gerelateerde links: – If you want to see the Jumping Jacks created in my classes at SVAC, go to this link: https://bookzoompa.wordpress.com/2011/01/02/paper-jumping-jack-toys-made-by-students/ and Wat Meer Trekpoppen: More Jumping Jacks.

Also, for a post (written in Dutch) which list links to a variety of Jumping Jacks articles, visit  http://hobby.blogo.nl/2007/09/03/patronen-en-kleurplaten-om-trekpop-te-maken/