Decoration · design

Domino: A Shape With Merit

Paper Cut Dominoes
Paper Cut Dominoes

The domino shape just doesn’t get enough respect.

You are likely familiar with the fact that the game of dominoes is played with tiles that are like two squares on top of each other. Much to my delight and surprise, about a year ago, mathematician Justin Lanier enlightened me to the fact that this rectangle, which is twice as long as it is wide, has a specific name and that name is DOMINO.

(pause. paste in Matt Vaudrey’s reaction…

domino Hallelujah
https://twitter.com/MrVaudrey/status/601777262871060480

…ok, continue with post)

This may not seems like such a grand reason to celebrate, but, over the past year, by being able to pull this definition out of my back pocket, both my teaching and my structural problem solving have improved and deepened.  There is something about calling something by its proper name that has value.

Domino  https://en.m.wikipedia.org/wiki/Domino_(mathematics)

students 2002
students 2002

For decades, with thousands of children who have done bookmaking with me, I’ve been trying to figure out how to get students to decorate their books using geometric shapes in a meaningful way. A meaningful way means, to me, getting them to really understand and exploit the characteristics of the shapes. Thousands of children for decades means I can try out one idea after the other, attend to nuance, and maybe even figure out a thing or two.

Cover Made by First graders 2010

I’ve known for a long time that starting with squares can help reign in the chaos of making decorations for books. I actually use to cut out and distribute piles of squares to students so that they could work with squares.

Lots of cut squares
Lots of cut squares

Yeah, I would spend hours cutting little squares out brightly colored card stock. Even now it’s painful looking at these squares, remembering those late nights of cutting cutting cutting… and then the students would want to  smear glue all over their books and sprinkle the squares like candy on them and, when the glue dried, half of the squares would fall off because the gluing was sub-prime. Ok, I’m sort of exaggerating:  Many turned out beautifully, but I still didn’t feel like the kids were getting the most out of the activity: they weren’t making the connection that I was hoping for with the square.

Dominoes, cut into squares, then half squares, which turn out to be a scaled down domino, then halved again to make small squares

Eventually I realized that I could give students the double-square shape, though at this point I didn’t know that it was called at domino. I show students how to line up two of these double-square perpendicular to each other,  from which they cut “on the line” that separates the colors, and snip, snip, they have four squares. If they cut the square again, this time by eye, they have scaled down rectangles, and they can then cut these in half to make baby squares. Yes, baby squares. These are young children and young children like baby squares. I also talk to the about rotating the square, cutting it from point to point to make two triangles, and then cutting the triangles in half to make baby triangles.

Dominoes cut and arranged
Dominoes, cut

Now just this year, during this teaching season, I have a made a point to introduce the double-square shape by name. The students I work with are shape savvy: they know what a rectangle is and they know that the square is a special kind of rectangle, but their eyes light up when I tell them a that a double-square shape is a special shape too, a domino. Does it make a difference for them to call it by name? I answer that with a resounding YES.

Emperor Penguin Book
Lily’s Emperor Penguin Book

It’s been like night and day. Students seem to honor the shape and special qualities of the domino. I know this because, with the hundreds of students that I’ve worked with this year, I saw, for the first time, the overwhelming majority of students being at ease with the idea of working with just the shapes that I talked with them about. There was so much less arbitrary cutting of paper, so much less just slapping down whatever shape that emerged from a hastily cut paper strip.

Thinking hands
Thinking hands

Across the board, with the introduction to the domino, students approached this part of the project with a sophistication that I had never seen before.

pages in progress with cut paper decoration

Instead of having to wade through photographs to show the type of work that I think is most valuable to show, I am finding it hard to choose between all the interesting work that these students are making.

Mostly Green
Mostly Green

I look at these and I can sense that the student is connected to the underlying structure. If you don’t know what I mean by that, just look again at these photos.

It seems to me that I even have metric which tells me that this is not just something I’m imagining. One of the other techniques that I show students is how to make paper spring.  This is a challenge for most students, but a worthwhile one, as they love  how it gets used in their books. Though not a domino shape, it is made by having an awareness that the two strips of paper they start with are of equal width, and I show them how to weave and rotate the strips down into a square.

Working hands
Working hands, paper spring made with paper strips that are 8 times as wide they are  long, which, is  I am told by mathematician Paul Salomon,  an octomino

After first showing them the techniques of decoration with the domino it was astounding how quickly the students understood how to do the spring.

Paper Spring, completed
Paper Spring, completed  Interesting fact: my page on How to Make a Paper Spring has been visited more than 16K times

In fact, in each class, these parts of my presentation went so quickly and smoothly that I kept checking my notes, thinking I had missed some part of the lesson because there was so much extra time.

Needless to say, I have much respect for the domino.

For the last few months I have been casually, now more seriously, studying a folded paper structure in Chinese Folk Art, called the Zhen Xian Boa. My plan is to write a number of posts on this structure. It’s not hard to figure out that part of my fascination with the structure is that, from beginning to end, there’s the domino.

Zhen Xian Boa , Chinese Folk Art

Here’s some links to look at about the Domino

Two from Wikipedia:

 https://en.m.wikipedia.org/wiki/Domino_(mathematics) 

https://en.m.wikipedia.org/wiki/Domino_tiling

And here’s a wonderful paper written by Paul Salomon and Justin Lanier, about the ways to think about dominoes and other polyominoes  https://mathmunch.files.wordpress.com/2015/08/moves-proposal.pdf

Justin Lanier just shared this link to a video after reading this post. Perfect. https://www.youtube.com/watch?v=yXL4DP_3dJI


Uncategorized

Scaling and Transforming for Design with 7 year-olds

Cut-paper Scalin
Cut-paper Scaling

I’ve been reading on-line conversations lately about scaling and dilation (which are two terms for the same thing, I think). Repeatedly I’ve seeing questions from various people on scaling activities. This confused me at first, not the concept itself, but why did there seem to be such an interest in methods of teaching dilation? Turns out that this idea of proportional change is a key concept to grasp in math, and the nuances of it are tricky to teach. After thinking about it I thought about how artists and designers use scaling all the time, and I mean all the time. So, this week, when I was working with first grade students, I decided that I would present the decorative part of their project as an a math lesson, as an exercise in scaling.

The transformations of two 1.5
The transformations of two 1.5″ x 3″ strips of paper

Each student picked six strips of paper, which were 1.5″ x 3″ each. I told them that these strips are the shape of two squares on top of each other, and I knew that because they are twice as high as they are wide. I don’t think they understood that part, but that was fine. I just wanted them to hear the language, as I think that it conveys a sense of importance. I then showed them how if they lined up the papers so that they made an “L” they could see a square, which they could then cut, as in the photo above. From there we talked about how they could use the square for decoration. Since a plain square is,well, not too exciting I tilted the square for a more interesting look. Next I showed them what happened when the square was cut in half, corner to corner -one cut, two triangles! We then looked at what happened when the triangle was cut in half again, and then again.

Scaling down squares

I also showed the students that to make a scaled down square that they had to cut the original square twice, once in both directions. There is something about making “baby squares” that particularly captured their interest.

Scaling down triangles

Baby triangles were a big hit too.

Scaling handsThis is an activity that I’ve taught many times bu it seems to me that, judging from the results, this was the most successful day I’ve had of teaching this kind of embellishment.

Sacling 2

Their project, by the way, was making a book for their animal reports.

Scaling with elephantStudents have done their research, now they’ve made their books, next they will be adding writing to the books. This elephant will eventually be flanked by facts about his habitat and other interesting facts.

Scaling with birdThese students will be able to continue with these embellishments as they complete the rest of the books, I won’t be there for that part, but I think they’ve got the idea and these books well become even more wonderful.

Art and Math · Flip Book

The Animated Equation Book

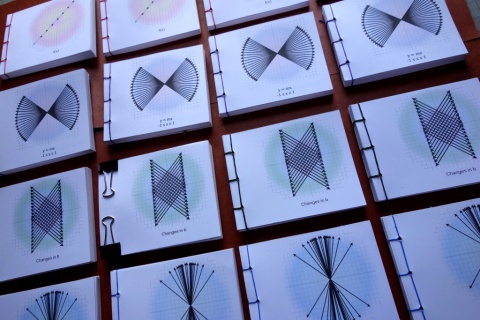
Flip Book Array
Flip Book Array

My Do-It-Yourself Equation of the Line Flip Books are ready to share.

I’ve been writing about these, on and off for months, but my work on them has been steady. My goal has been to create PDF pages that I can distribute on-line which a class of students can assemble in about 10 to 15 minutes,  and which show how the changing variables in the equation of the line, y = mx + b, changes the look of the graph. I am doing this because it seems to me that the understanding of this particular equation is either a gateway or an obstacle into the continuing study of mathematics. This is my way of contributing to the conversation of how to nurture a more math literate culture.

My thought is that if students can hold the equation in their hands, that it will give them the opportunity make sense of it for themselves.

I’ve made four sets of PDF’s. I  find that heavier weight papers makes the best flip book. I use Hammermill Color Copy Digital Cover paper, 60lb, but that said, if all you have is standard weight copy paper, use it.

Here are the PDF’s!

Changes in B
Changes in b                                                                                                                                    Click to watch a  brisk animation                                                                              Slower animation

The PDF for flip book of changes of b in y= mx +b

Changes in m between negative one and positive one.
Brisk animation
Slower animation

The PDF for flip book of changes of m between negative one and positive one

in y = mx + b

changes in m, greater than positive one , less than negative one.
Brisk animation
Slower animation

The PDF for Flip Book to show the changes in m greater than positive one, less than negative on in y = mx + b

Changes-in-x Brisk Animation slow animation
Changes-in-x                   Brisk Animation                                             Slower Animation

 The PDF for Flip Book to show changes in x on the graph of y = mx + b

There, now that you’ve downloaded all the PDF’s you’ll notice that, oddly, they look like this:

Sample of the PDF pages

What may or may not be obvious is that there are six pages on each panel, and half of these pages are upside-down. So now it’s time to give you some hints on how to make these pages into flip books, and tell you what’s up with the upside-down.

Each piece of 8 1/2″ x 11″ copy paper will contain six pages of the flip book. (To my A4 friends, I will be making an A4 version of these, but they are just not ready yet.) The pages need be cut out on the solid gray line. Let students do this with scissors! The pages are numbered, so it should be easy enough to get them in the right order. The important part, when assembling these books, is that the FLIPPING EDGES are even!!! That’s why half the pages are upside-down on the page, so that the flipping edge always fall on the edge of the paper so it doesn’t have to be cut.

Smooth Flipping on right, not so smooth spine on right, which is fine.
You can seen the top surface of the book on the left smooth. This is the flipping edge, which must be smooth. The spine of the book on the right is not smooth, which is fine.

Now, how to bind these small books…

Flip Book Bindings
Flip Book Bindings

Bookbinders will figure out their own ways to bind these books. These simple binding solutions are meant for the classroom or home school venue.

Before you start, note that the front and back covers aren’t numbered.  You can figure out which is which. Just be sure to flip over the back page so the graphic shows otherwise your back cover will look boringly blank.

The easiest way to put these pages together is to make sure that the flipping edge is even, then wrap a rubber band tightly around the spine. This simple solution works surprising well, though every so often you might have to remove the rubber band and realign the edges. The thinner the paper, the thinner your rubber band should be. Experiment. You’ll know what works and what doesn’t.

My favorite simple solution is to use strong clips, like on the upper right in the photo above. I just found out that these are called binders’ clips. Excellent name. Use the smallest size that works. The small ones, 3/4″ wide, work just fine.

If you have access to a drill, then doing a simple sewing is swell. Drill three holes evenly spaced, about 1/4″ from the spine and follow this sequence: go through the middle hole, leaving a tail of thread behind, sew through the top hole, travel down to and go through the bottom hole, then go back up through the middle hole and tie your ends together.

If you’re a bit more adventuresome and want to look up Chicago screw posts, these make excellent bindings for flip books.

Books books books
Books books books

That’s it. Make lots of books. Let me know how it goes.

Book Art · Books Made from one sheet of folded paper · origami pamphlet

The Autobiography of a Second Grader -back to school!

Pocketed Selves
An Autobiography Book by Gail DePace’s 2nd graders, 2010

I had planned that this post be about the Paul Johnson show, but I won’t be able to get in to photograph it just yet. Instead I’ve decided to seize the moment and write about this great back-to-school project that Gail DePace did with her 2nd graders a few years ago. Gail and I worked together many times, and I see my influence in these books, but Gail (now retired) was an inspired teacher in her own right, and just took off with any of the skills that she picked up from me. What she did here was make a  template of a young person, which each student personalized in their own likeness. With some simple folding the students created a pocket, which was glued on to the front of the book and which held the little self.


Origami Pamphlet, modified
Based on Origami Pamphlet folds

For the body of the book I’m fairly sure that Gail started out with a somewhat large sheet of paper, probably 11 inch x 17 inch (A3). The folds are based on the Origami Pamphlet folds. That cut away window in the middle makes a place for a secret picture, which is only revealed with when the book is set up in a certain way. Like this…

Looking through the window

Here the book is set up so you can peek into the lives of the author.

View from above
View from above

Here’s the bird’s eye view of the book. Have you noticed the bit of framing that is done around some of the little drawings? This is accomplished by providing each student with just one square post-it, which they mount, temporarily, in their book, then color around it, thus masking off what’s beneath.

2

As lovely as this structure is, it’s the content that makes them so fabulous. Student wrote about their family, about their favorite place to be (which was illustrated inside the window) and what they like and dislike.

It turns out that no one likes picking up their brother's dirty socks
It turns out that no one likes picking up their brother’s dirty socks

Then they ended the book with hopes for the future.

artist

Hmm. I love student work.