
This post is about giving anyone who is interested the specs on how to make the Countries Folder Book that I wrote about in my last post, Making Books about Countries for Third Graders.
This book has many different pieces to it, which makes it a dynamic project, but requires that the teacher has a good grasp of many techniques. I’m supplying as many tutorial links as I can to help the ambitious tutor through this ambitious adventure.

I use a cover weight paper for this book. The size is important: 17 1/2″ x 23″, so that when it is folded in fourths, as in the illustration above, the inner pocket is big enough to store full size sheets of paper. These papers are the students raw notes, which they refer to when they are making their little books.

On the upper left side of the folder there is a color copy of Brazil’s paper money, attached to the page on a paper spring
Lower on the page is a little rubber band pamphlet book. This one was made from half sheets of copy paper, folded in half, nested together, then held together on the spine with a #19 rubber band. There are some lovely examples of these in the previous post so be sure to take a look.
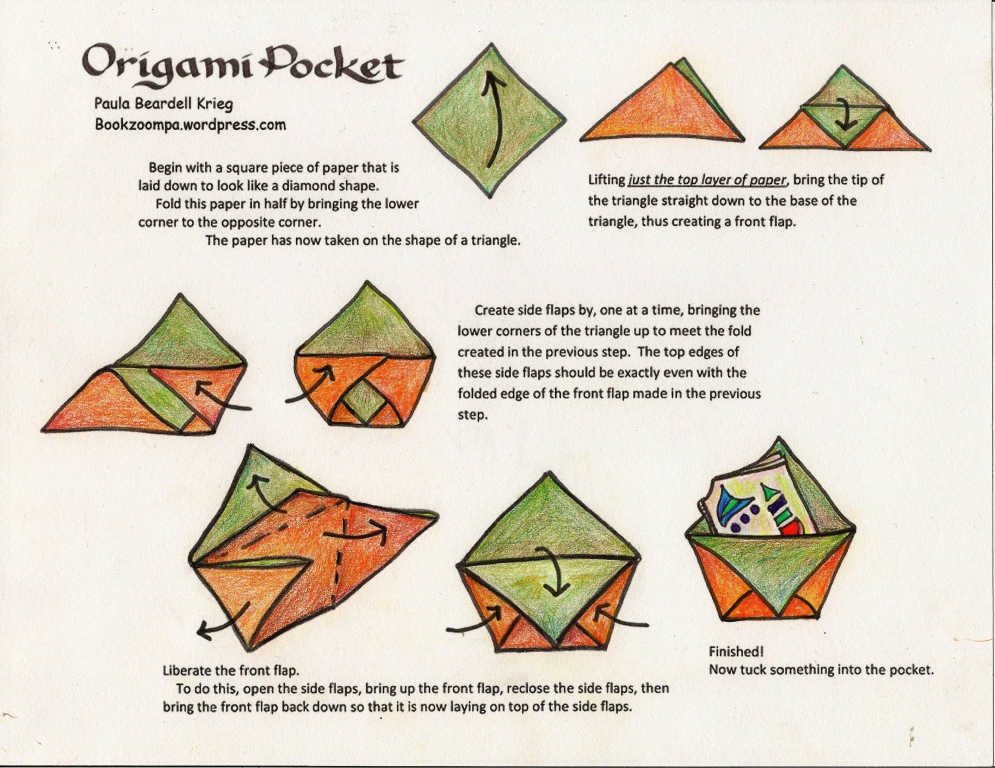
The pamphlet book is stored in an origami pocket.
There is a 3″ x 6″ heavyweight paper “hook” in the middle of the right side of this folder. Take a look at the drawing to see the hook: in the photograph it is hidden behind the book. This heavy weight strip of paper is only partially glued down. The upper third is not glued down: a book hangs by its rubber band spine on the hook.
The book on the hook is made of two sheets of paper folded together so that its pages reveal the pages below. They are bound together with a .#19 rubber band. This is often refered to as a graduated page book.
Here are some great examples of some of the graduated page books made by these talented third graders.

These pages were made from regular copy paper, cut in half. Notice that we photocopied lines on to the pages.

The energy in this child’s writing and drawings makes clear his enthusiasm for this project.

The drawings on these were made from the backs of cut up pieces of filing cards.
The last thing I want to write about is the flag and the v-shaped pop-up that it is attached to. First, the flag.
What I generally like to do with flags is to provide the students with colored paper with which they “build” the flags. For Brazil this meant cutting a green rectangle, a yellow parallelogram and color copy of the center of the flag. Most flags can be “built” fairly easily with colored paper (the USA flag is the great exception!). The Canadian flag can be tricky: I provide the color strips, and an outline of the central leaf, which students color in.
Next time I do this project I probably won’t use the v-shaped pop-up, Instead, I think I would try a simpler square. You’ll have to search out your own directions for this one!


Dear Ms. Beardell Krieg,
While looking for projects and ideas to share with
my son, I began to see some of your helpful and creative postings.
I grew up in Morris Plains, N.J.. I knew a Paula
Beardell in that area. Would you happen to be the same Paula Beardell?
Sincerely,
Scott Kaufman
Tijeras, NM
LikeLike
Yes, I am that Paula Beardell. Are you one of the three young men that I spent lots of time with when you were very young? I gave you a mug when you turned 13, which started a mug collection….?
LikeLike
Hi Paula
I have come across a copy of an article “Jelly Bean Books” bu you, which looks like it’s been published in a magazine. Unfortunately, I only have step 1, and steps 5 and 6, so can’t quite work out how you get the book folded and utilise all the lines you make in step one. Would you consider sending me a link to the instructions for these little books please? I love papercraft, specifically book binding and card making, and collect any new ideas I find.
I look forward to hearing back from you
many thanks
Bronwyn
LikeLike
Take a look at https://bookzoompa.wordpress.com/2011/01/12/jelly-bean-books/
LikeLike
any chance you can send me a template for the jumping jack toy? Am doing a workshop with children next week but am not very artistic!
Ideas all looks really good.
Thanks
LikeLike
thanks for asking! I have a couple of tempates that I would be happy to share. I will send them to your email address. If there’s a choice between black and white, which the children can color in themselves, or in full color, do you have a preference?
LikeLike