Time to finish up this Jacob’s Ladder. I had it in mind to develop this way of working with the Jacob’s Ladder so that it could be replicated by others, but it’s just way too specific and involved for me to actually encourage someone it do what I’ve done here. Rather than being a project to share, this has been more like designing a product to produce. But, still, there’s a few things here that I want to write about.
(If you’re not sure what a Jacob’s Ladder is take a look at http://toymakingdad.blogspot.com/2010/09/making-jacobs-ladder.html or https://bookzoompa.wordpress.com/2014/11/16/a-jacobs-ladder-number-line-in-progress/.)

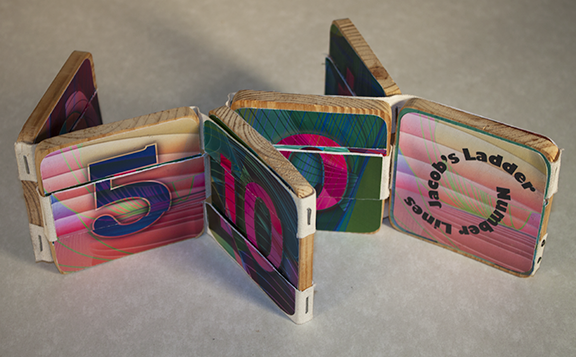
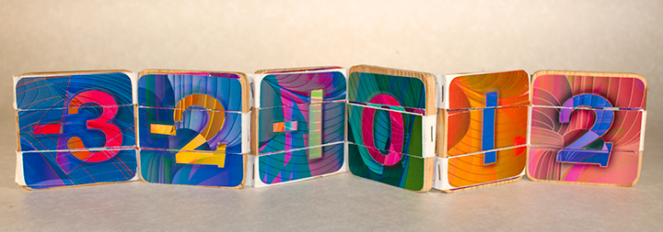
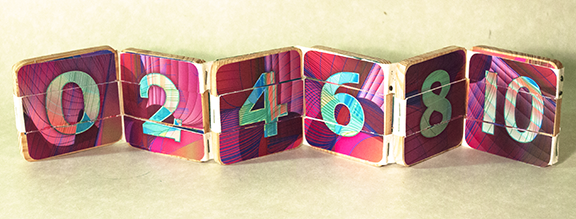
I’ve been working with the Jacob’s Ladder in the same way that I would work with a flexagon: in other words, I’ve been interested in making complete transformations happen when the Ladder is flexed. This resulted is having four completely separate sides to discover. Here they are:


I had such a good time watching this come together!
The first thing I want to point out is the first and last panels of Side#1 and Side #4: they are both zero’s and both title pages. These two pages are the only two sides that don’t really change. I had to work these panels into the sequence, and I had to keep in mind that, in fact, they do change, but that change is only that they flip upside down. So not only did I have to make them work as part of sharing a sequence, but I had to figure out a way to have them make sense upside-down and right-side up in each of the sequences. And if that sentence just made your head hurt you can empathize with me. (Thank you.)
At first I thought I would begin with a one, since that can go upside-down, but finally decided that a zero was better. It took me awhile to realize that I couldn’t make the other end a number, I just couldn’t make it work. Making a cover page, though, seemed like a good solution.

I think that this turned out to be equally legible from any vantage point.
If you decide to try to make one of these I do have one major tip for you to consider. I think that most of the sets of directions that are out there have this one fatal flaw in common: they direct you to assemble the different sections in a line, growing it so that it resembles the completely unfolded Ladder. I have followed different renditions of this same theme, and, although the directions have been flawless in terms of accuracy they are confusing to follow. Following directions for sewing book sections together have can also have this same maddeningly confusing accuracy about them, too, so I’ve learned to look for patterns in the sequences, so I can just discard the directions. It’s a great way of working.
For the Jacob’s Ladder, assembling it is much easier if you stack the sections, weaving the ribbon around the blocks in the only logical way to wrap them. The trick is to start out right. Here’s how to start out right:

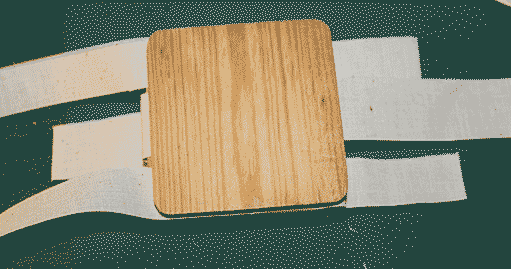
Make sure your three long strips of ribbon are a bit longer than your finished Jacob’s Ladder will be (some set of directions have you cut lots of small pieces and attach them in certain patterns, but I find this, at best, cumbersome). In the photo above I’ve been overly generous in the overhanging piece, but you should get the idea that the upper and lower long ends extend to the left and the middle long end extends to the right.

For the second step, lay the second board on top of the first, and wrap the ribbons around the board in the only way that makes sense.( If this makes no sense to you now, you’ll see what I mean if you try it.)

Next, lay down the third board, and, again wrap it. Continue doing this until you’ve run out of ribbon or boards. You’ll have a neat little stack that you should hold together well until you are able to attach (with nails or staples) the ribbons to the edges of the board.

The ribbons make this checkerboard-like pattern. Quite distinctive.
I had meant to take some time in this post to write more about why I keep doing these number lines, but I think I will save that for a different day. It’s time for me to sign off for the night. I’ll be counting sheep soon…

Paula, this is crazy cool! Yes, my head hurts, but happily so. Too long since we last talked. C
LikeLike
Love the idea of the Jacob’s Ladder having 4 different “sides”. As a visual artist, I’m interested in creating a ladder with images that change, rather with than numbers. I have no clue how to make something like this happen. Any suggestions?
Many thanks!
Marie
LikeLike
HI Marie, If you are ever in my area of upstate NY I would be happy to show you the mechanics of the structure. I think that the biggest challenges are planning out how the images work together and working out what materials to use for the images to exist on. It’s not so hard to make a Jacob’s ladder.. there are lots of tutorials around, but it takes some trial and error to get it to behave in the way that you might want. My first suggestion is to just jacob’s ladders, just plain ones, and get the hang of them before thinking about images. Good luck!!!!
LikeLike